Monday, October 15, 2012

Because Boys in Books are Better: My Book Boyfriend Sam Roth from Shiver

Ok, so I was hoping to have a review for today but I didn't have time to finish the library book I was working on over the weekend and now it is due today. Sad face!

Anywho, I decided to brighten everyone's Monday with a post about one of my book boyfriends, because who doesn't enjoy looking at pictures of cute guys?? ;] And we all know that boys in books are better.

My Book Boyfriend: Sam Roth

One of my favorite book boyfriends is Sam Roth from Maggie Stiefvater's Shiver trilogy. I absolutely adore Sam's character--he was so sweet and exactly the kind of guy I would love to date. And he's a werewolf! How cool is that??

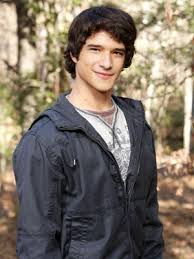
I picture Sam looking something like Tyler Posey (from MTV's Teen Wolf). I picture Sam as attractive, but more on the cute, gentle side than rugged and hot. Plus Tyler Posey plays werewolf Scott McCall, so he's already got the werewolf part down. I think that Tyler would be PERFECT to play Sam in the upcoming Shiver movie!

Book Boyfriend Profile


Name: Sam Roth
Age: 18
Appearance: Lanky frame, floppy black hair, golden eyes
Species: Werewolf
Interests: Reading, playing guitar, folding paper cranes
Fear: Bathtubs
Favorite Quote: “Grace,” I said, very softly. “Say something.”
Sam,” she said, and I crushed her to me.”
Why I Love Sam: He is sweet, gentle, loving, thoughtful, and compassionate. He is always there for his girl and loves her unconditionally.    


Do you think Tyler Posey makes a good Sam? Who do you picture as Sam?

Happy reading!

Friday, October 12, 2012

Sometimes You Fall Off the Face of the Planet (And It Takes a While to Find Your Way Back)

 A Place With No Gravity

Lately, I have fallen of the face of the planet in regards to my blog. It has been nearly two weeks since my last post. I never intended to take a break from blogging it just...happened.

Sometimes, life gets in the way of things you enjoy, such as reading and writing reviews. I have been extremely distracted lately, and combine that with finals, extra hours at work, and a reading slump and I found myself falling, falling, falling....

Making A U-Turn Back To Normalcy


And I'll admit, I'm a new blogger. I don't have this whole blogging thing down yet. I'm still learning, experimenting, and trying to figure out how to balance blogging with everything else in my life. This is my first blogging slump and it's really frustrating :P

But things should be getting back to normal now. Finals are over (for now), my work schedule is back to the way it was, and distraction shouldn't be a problem anymore. I'm hoping to post a review on Monday and get back to blogging consistently like I was before!

Switching Things Up A Bit


However, I do think I am going to make a few changes. I think I took on a little too much to start off with. So, I think I'm going to get rid of my writing tip feature (for now anyways). I might still do an occasional writing tip here or there, we'll see how it goes.

But I'm just going to focus of book reviews for now, and I will probably post one review a week. I'm still going to try to stick to my Monday, Wednesday, Friday posting schedule. They won't all be reviews but they will be something bookish related.

Anyways, that's all for now. I just wanted to explain what's been up, but I'm getting re-focused and back on track so stay tuned for future bookish awesomeness ;]

Have you ever had a blogging slump? How did you get through it? How do you manage your time in order to post regularly?

Happy reading!

Sunday, September 30, 2012

How to Make a Quiver for a Katniss Everdeen Costume (Or For Everyday Use)

Alright, so this is a little off topic beings that this is a book review blog, but I really wanted to share this!

It's now October, and Halloween is quickly approaching and people are starting to think about their costumes.

With the popularity of the Hunger Games, (and just archery in general--ex. the new NBC show Revolution) I can see a lot of people dressing up as Katniss Everdeen. And what Katniss costume would be complete without a quiver??

The quiver I made is actually for everyday use, not for a costume. I was tired on setting my arrows on the ground, and I wanted a quiver! (I'm going to be Red Riding Hood for Halloween, in case you were wondering ;] )

Problem is, quivers are expensive--$70-$100 or more. I'm a poor college student and don't have money to spend on that right now haha. So, I made my own! And for around $8 which was totally in my price range ;]

Luckily for you, I had the presence of mind to take pictures of the processes and I put together this tutorial so you can make one yourself, either for personal use or a Halloween costume. Let's get started!

Difficulty level: 7/10 (some sewing skills required)
Time: Approx. 7hrs (this is a really time-consuming process! But since you have a tutorial and I had to figure everything out myself as I went, you could probably make it more quickly.)
 Materials: 
  • a cardboard box
  • 2/3 yd of leather-like material or suede (I got mine on sale from Joann's in the suede section)
  • brown thread
  • contrasting embroidery thread
  • a hot glue gun 


STEP 1: Think about your design


There are different styles you could make for your quiver, you don't have to make yours look exactly like mine. This was the photo I used for inspiration while making my quiver.

You can look at different quiver designs here.


STEP 2: Make a tube


First off, take your cardboard box and cut off a piece as long as you want your quiver to be. I cut off a side and a flap of my box to get the length I wanted. I made my quiver about 26in long, but you can do whatever length you like.

Once you have your piece of cardboard, you are going to make a giant tube. Notice how stiff the cardboard is. If you try to make a tube now, you will get more of a hexagonal shape.

So, you need to make the cardboard flexible. Do this by curving/bending the piece of cardboard bit by bit. This takes a while :P When you're finished, you should be able to roll up your cardboard into a nice round tube. Get it as round as possible, getting rid of any straight edges.


STEP 3: Choose your diameter and secure


Now that you have your tube you can decide how big you want it. I put my arrows in my tube for scale, and played around with size until I got it where I wanted. I chose a 3.5in diameter, but you can do any size you like.

Once you have chosen your diameter, cut off the excess cardboard. Bring the two edges together, but don't overlap them! You want a flat surface, overlapping will cause a bump. Secure the edges together with a sturdy tape. (I used clear packing tape).


STEP 4: Make a bottom


Place your tube onto another piece of cardboard and trace a circle around it. Cut out the circle, and trim it until you can get it to fit inside the bottom of your tube. Once it fits, secure it with tape.


STEP 5: Measure out your fabric


Lay your tube on your fabric, and wrap the fabric around it. Mark where it wraps all the way around, but leave yourself an extra inch or two to overlap the pieces. I also left myself lots of extra material on the top and bottom--probably around 3-5in on each end.

Once you have everything measured out, go ahead and cut your material. You can also go ahead and cut out a circle for the bottom piece. Make sure you cut the circle a little bigger than the actual bottom. (If its too big you can always trim it later).


STEP 6:  Sew your end pieces


You can do this part on a sewing machine, but I did mine by hand. A sewing machine would be easier and quicker, though. (I just like to make my life complicated :P) First, decide how big you want your end pieces to be. I did my bottom piece 2.5in long and my top piece 6in.

Start with the bottom piece. Give yourself a little more (1/2in-1in) than the length you want (so in my case that would make 3.5 in). You are going to fold over the excess and make a hem so you have a neat, clean edge.

Cut your bottom piece off of the material you have just measured for your tube. (This is why I said to leave yourself extra length).


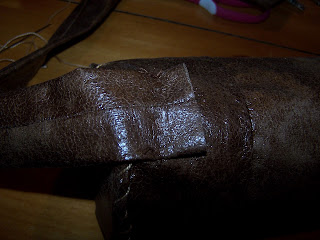
I was using the underside of my material to measure. Now, you want to flip over your material to the front side. Fold over a little bit of your new bottom piece to make the hem, and lay the part where it is now folded over on the edge of your larger, original piece of material. Secure with pins. Like so:


Now, sew the material just below the fold of your hem. If you do this by hand make sure you have a sharp, larger needle because it will be hard to pierce the layers of fabric.

When it's done it should look like this (I apologize for the crappy pictures, my camera hates me):


Meh. You probably can't see the stitching. But I promise it's there!

Anyways, you're going to basically the same thing for the top piece. Move to the other end of your material and measure how long you want the top piece (giving yourself extra for a hem). Cut your material, fold the hem, secure with pins, and sew. Hopefully (if you measured right!) you have several inches of extra material left that you will be able to tuck inside the top of your tube.


STEP 7: Add some details


Take your fabric and wrap it around your tube. Try to get the edges of your hems where they meet as even as possible. You can secure the fabric in place with pins.

Now, in a couple steps you are actually going to glue the material to the tube. But you want to make it look like it's sewn on ;] Let's start with the end pieces.

The left edge of your fabric should be the one on top that overlaps. You are going to sew all your details onto the edge of the left side. I left mine wrapped around the tube while I did this but you don't have to.

Once again, I did this by hand but you could use a sewing machine. You could probably even skip this part, but I wanted more detail on mine. On the top and bottom pieces, I sewed small x stitches:


STEP 8: Sew on the bottom


Take the circle you cut out earlier and place it on the bottom of your tube. If it overlaps a little bit that's okay, you can trim it if you need to. Take a larger needle that can pierce the fabric easily and leave a big enough hole for your embroidery thread to fit. Sew around the edge of the circle.


STEP 9: Secure fabric with glue


Take your hot glue gun, and glue down the right edge of your fabric to the tube (remember you want the left side to overlap!).


STEP 10: Add final details and finish gluing


Almost there! Okay, so now you want to fold over your flap and sew some larger x's along the middle length of your quiver with the embroidery thread. How many and what size is up to you. To help you decide, you can cut pieces of thread and lay them on the quiver to see what it would look like.


 Once you've finished, it's time to glue it down! Get the edges where your hems meet lined up as closely as possible. Also, try to pull the fabric around the tube as tight as you can.

Now, take your glue gun and glue under the places on the ends where you added stitching, and add dots of glue on the underside of the x's in the middle. This will help it look like it's been sewn rather than gluing the edge down flat. Tuck the extra fabric at the top down into the tube and glue it down as well.

Your quiver should now look something like this:


STEP 11: Make a strap


You should still have some extra material left over. Cut a length of the material, and fold it in half depending on how wide you want your strap to be. (I think I made mine around 2in).

You can sew it by hand or on a sewing machine. I did this part on the machine because it would've taken forever to do my hand. (And when I say I, I mean my dad because he knows how to use my grandma's old sewing machine and I don't :P)

Sew along the edge opposite the fold, and then turn inside-out.


Now, figure out how long you need your strap to be by having someone hold your quiver behind you against your back and holding the strap to either end of the quiver. Cut off any extra length.

My dad insisted I sew the strap onto either end before I glued it, but since the material was already glued down onto the cardboard tube this was a big pain! And it was hard to get the needle through all those layers of fabric! I think that hot-gluing it would be enough, but you're welcome to try sewing it too haha.

You are going to lay the strap onto the bottom of the quiver and create a little hem. If you do sew, sew along the part where it will crease when folded over. You will also hot-glue this part down, and a tad higher just above the hem so that the hem will be hidden. (You'll see what I mean as you do this). Repeat for the top and bottom.

You can also add an x with the embroidery thread like I did to make it look sewn on. But do this BEFORE you glue it down!! 


ENJOY YOUR NEW QUIVER!!


If you have any questions, please ask in the comments below! Also, if you make this I would love it if you would let me know and send me a picture, link, whatever :D It would seriously make my day!

Good luck, and Happy Hunger Games! May the odds be ever in your favor ;]
Wednesday, September 26, 2012

Beautiful Creatures Movie Trailer!

So to make up for my lack of a writing tip this week, I have a quick post about the Beautiful Creatures trailer! Yay!
"There were no surprises in Gatlin County.
We were pretty much the epicenter of the middle of nowhere.
At least, that's what I thought.
Turns out, I couldn't have been more wrong.
There was a curse.
There was a girl.
And in the end, there was a grave."
-Beautiful Creatures by Kami Garcia and Margaret Stohl


Alright, so after watching the trailer I have to say that I am really excited to see this movie! The Florence & the Machine song, Seven Devils, was PERFECT for the trailer and mood of the book, and it made it feel so epic! You can view the trailer here.

I'm not too crazy about the cast, honestly--the characters don't look anything like I pictured them. I'm fine with the girl who is playing Lena (Alice Englert), but I really don't like the guy who's cast as Ethan (Alden Ehrenreich).

He doesn't look like how I pictured Ethan AT ALL and I don't know if I'll be able to get used to him. Hopefully he will do a good portrayal of the character, though. (And that was one epic kiss in the trailer!)

You can view the full cast here.


Even though I have mixed feelings about the books, I will definitely go see this movie. I really did like the first Beautiful Creatures book--the setting, the story, the characters. But sadly, for me I liked each book less and less as the series went along. But maybe I would enjoy them more as movies? Hmm.

What do you think? Do you like the cast? Will you see the movie?

Dark secrets will come to light.

2.13.13

Monday, September 24, 2012

Of Poseidon by Anna Banks

Title: Of Poseidon
Author: Anna Banks
Pages:336
Publisher: Feiwel & Friends
Series: Of Poseidon #1
Released: May 22, 2012


The Story

"Galen is the prince of the Syrena, sent to land to find a girl he's heard can communicate with fish. Emma is on vacation at the beach. When she runs into Galen--literally, ouch!--both teens sense a connection.
But it will take several encounters, including a deadly one with a shark, for Galen to be convinced of Emma's gifts. Now, if he can only convince Emma that she houlds the key to his kingdom..."

Our Heroine: Emma

"I smack into him as if shoved from behind...The fire on my cheeks has nothing to do with the fact that it's sweaty-eight degrees in the Florida sun and everything to do with the fact that I just tripped into the most attractive guy on the planet. Fan-flipping-tastic...I think I can see the shape of my cheek indented on his chest." (p. 1-2)
I absolutely loved Emma! She was funny, spunky, and stubborn. The book alternates between her and Galen's POV, and her's is written in first person while his is written in third. Emma has a very well-developed "voice" and I loved her sense of humor.

Here's a little taste of what I'm talking about: "That Galen found me clear across the country seems more miraculous than a push-up bra." (p. 43) I was grinning/giggling throughout the whole book!

I also adored the romance between her and Galen. At first I was worried because it felt a tad bit like insta-love at first, but as the story went along I felt more that it was instant attraction and she gradually developed deeper feelings for Galen as she got to know him better.

I also appreciated that Emma was a strong character and had a good, sensible head on her shoulders. She doesn't totally lose herself over Galen and melt in a puddle at his feet and throw herself at him. She is attracted to him but she remains sensible and feisty towards him, and she does not give him an easy time of things!


Main Characters


  • Galen
 "It feels like...like wrestling with an electric ray. And then when we touch, it's like swimming over a volcano vent. Hot, all over. But it's more than that. You know how you feel when one of our own is near?...I'm not just aware of Emma. I'm...I'm..."
"Drawn to her?" 
Galen looks at his friend. "Yes, exactly." (p. 53)
Galen was sweet, thoughtful, and gentle, though with a bit of a temper and a jealous streak. I loved him and Emma together!

There were also many funny moments because Galen is a Syrena (what the mermaids are called in the book), and even though he can take human form he doesn't know everything about them and sometimes isn't very good at being human.

  • Rayna & Toraf
"Galen greets his friend with a strong punch to the arm. "Good to see your tracking skills are still intact after the accident and all."
Toraf stares at Rayna's back. "Accident, yes. Next time, I'll keep my eyes open when I kiss her. That way, I won't accidentally bust my nose on a rock again. Foolish me, right?"" (p. 48)
Rayna is Galen's twin sister, and the mate of Toraf, Galen's best friend. I loved these two characters! Rayna was hot-tempered and strong-willed. Toraf was loyal and totally adored Rayna, who turns down all of his affections.

The interactions between the two of them were funny and sweet, I loved the two of them together! It seems like Rayna hates Toraf's pursuit of her, but Toraf's theory is that Rayna acts like she hates him to make him chase her harder to get more attention.


To Read Or Not To Read? 


Ohmysweetgoodness! I totally fell in love with this book!! I was not expecting to like this book as much as I did, but I was totally captivated by the characters. This is the first mermaid book I've ever read, and I found it very interesting!

Of Poseidon was well-written with characters you will fall in love with and that will stay with you long after you've turned the last page. I would definitely recommend it! If you are a fan of the Paranormalcy series by Kiersten White, I think you would really love Of Poseidon because it is written in a similarly feisty, humorous way.

I seriously need the next book, like right now! Gah. I'm going to go crazy waiting for the sequel, Of Triton. I can't wait to read more about these characters and see what happens to them next :]

Writing: 5/5
Characters: 5/5
Plot: 4/5
Creativity/Originality: 5/5
Kept me interested: 5/5


Related Posts Plugin for WordPress, Blogger...